本文为原创文章,未经本人允许,禁止转载。转载请注明出处。
1.MNIST数据集
MNIST数据集来自美国国家标准与技术研究所(National Institute of Standards and Technology)。数据集由来自250个不同人手写的数字构成,其中50%是高中学生,50%是人口普查局的工作人员。
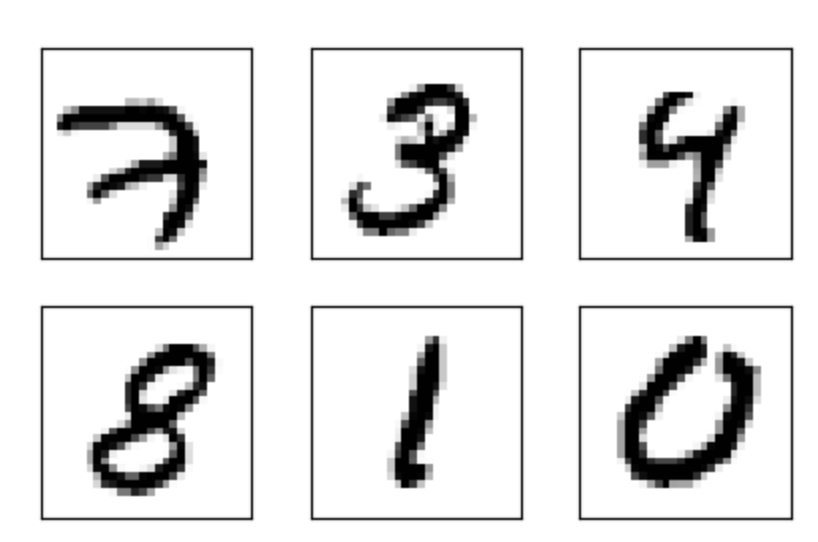
MNIST官网:http://yann.lecun.com/exdb/mnist/。其中包含60000个训练样本和10000个测试样本,每个样本都是一张28*28像素的灰度手写数字图片。如下图所示:
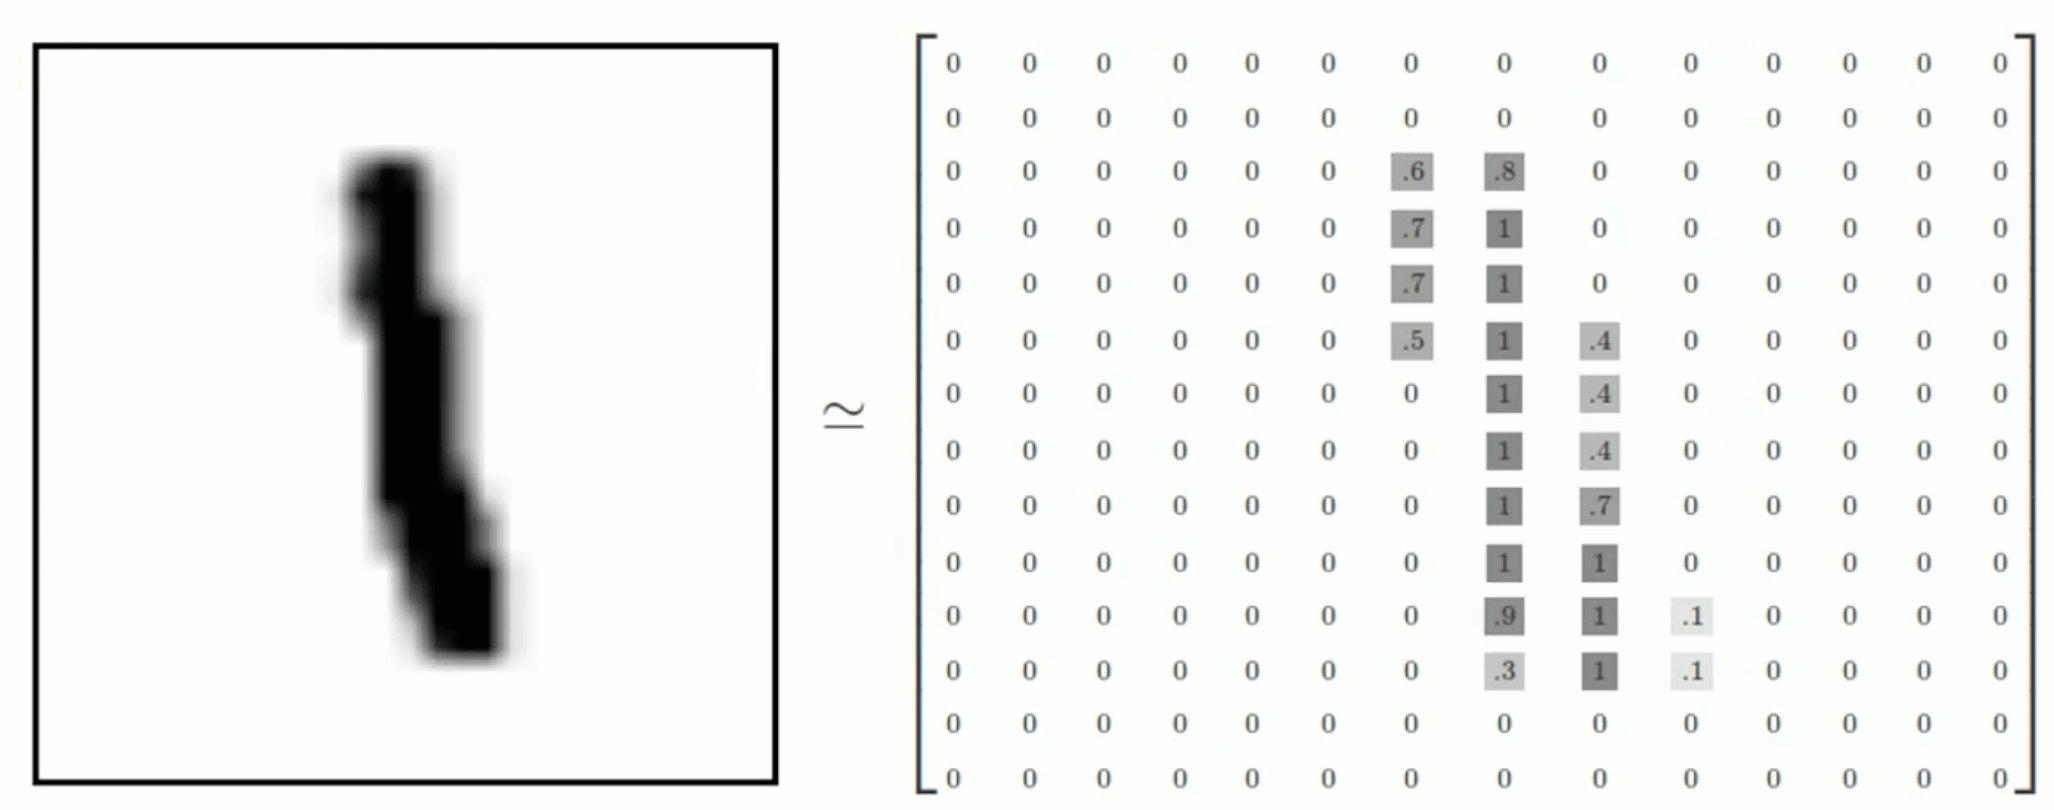
我们将这样一张图像展成一个向量,大小为($28\times 28 \times 1=$)784。因此,MNIST训练集中mnist.train.images是一个形状为$[60000,784]$的张量。并且图片中的像素被归一化至$[0,1]$:
同理,测试集的大小为$[10000,784]$。
MNIST数据集的标签是介于0-9的数字,我们通常将标签转化为”one-hot”编码,比如标签0表示为([1,0,0,0,0,0,0,0,0,0]),标签4表示为([0,0,0,0,1,0,0,0,0,0])。因此,mnist.train.labels是一个$[60000,10]$的张量。同理,测试集标签的大小为$[10000,10]$。
2.手写数字识别模型
那么现在我们通过训练MNIST数据集创建一个手写数字识别模型。
2.1.下载并读取数据集
1
2
from tensorflow.examples.tutorials.mnist import input_data
mnist=input_data.read_data_sets("MNIST_data",one_hot=True)
tensorflow提供了现成的MNIST接口,可以直接从文件夹MNIST_data内读取数据集。使用tensorflow读取MNIST数据集时需要注意:每一行为一个样本,每一列为一个属性。
如果文件夹MNIST_data不存在或者该文件夹内没有对应的数据集,则该语句会自动创建MNIST_data文件夹并下载MNIST数据集。
2.2.构建神经网络
2.2.1.定义网络的输入和输出
1
2
x=tf.placeholder(tf.float32,[None,784])#28*28*1=784
y=tf.placeholder(tf.float32,[None,10])#0,1,2,3,4,5,6,7,8,9
2.2.2.搭建网络结构
以单层神经网络为例,因此我们不需要构建隐藏层,可以直接计算网络的输出。
1
2
3
W=tf.Variable(tf.zeros([784,10]))
b=tf.Variable(tf.zeros([10]))
prediction=tf.nn.softmax(tf.matmul(x,W)+b)
2.2.3.cost function
我们使用均方误差作为cost function。
1
loss=tf.reduce_mean(tf.square(y-prediction))
2.2.4.优化算法
使用梯度下降法:
1
train_step=tf.train.GradientDescentOptimizer(0.2).minimize(loss)
2.2.5.统计预测结果
首先将预测结果与正确标签进行比对:
1
correct_prediction=tf.equal(tf.argmax(y,1),tf.argmax(prediction,1))
👉tf.argmax(input,axis=None,name=None,dimension=None,output_type=tf.int64)的用法:返回最大值的索引。axis=0返回每列最大值的索引,axis=1返回每行最大值的索引。例如:
1
2
3
4
5
6
7
8
9
10
11
12
13
import tensorflow as tf

vector=[1,2,3,10,6,7,8]
matrix=[[1,2,3,5],[2,8,4,6],[10,2,5,7]]

with tf.Session() as sess:
    idx1=tf.argmax(vector,0)
    idx2=tf.argmax(matrix,0)
    idx3=tf.argmax(matrix,1)

    print(sess.run(idx1)) #输出为:3
    print(sess.run(idx2)) #输出为:[2 1 2 2]
    print(sess.run(idx3)) #输出为:[3 1 0]
👉tf.equal()应用举例:
1
2
3
4
a=tf.constant([[1,2,3,4,5]])
b=tf.constant([[2,2,5,4,6]])
with tf.Session() as sess:
    print(sess.run(tf.equal(a,b))) #输出为[[False  True False  True False]]
然后计算预测正确率:
1
accuracy=tf.reduce_mean(tf.cast(correct_prediction,tf.float32))
👉tf.cast(x,dtype,name=None)用于数据类型转换。第一个参数x为待转换的张量,第二个参数dtype为目标数据类型。例如:
1
2
3
4
5
a=tf.constant([[1,2,3,4,5]])
b=tf.constant([[2,2,5,4,6]])
c=tf.equal(a,b)
with tf.Session() as sess:
    print(sess.run(tf.cast(c,tf.float32))) #输出为[[0. 1. 0. 1. 0.]]
这样我们通过tf.reduce_mean得到的平均值即为模型准确率。
2.3.运行模型
1
2
3
4
5
6
7
8
9
with tf.Session() as sess:
sess.run(init)
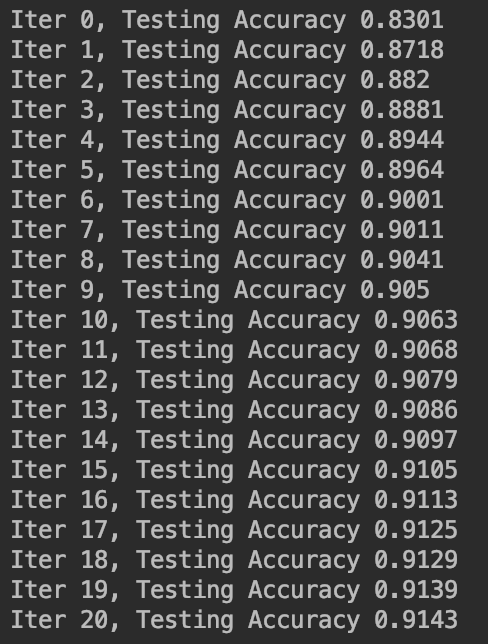
for epoch in range(21):
for batch in range(n_batch):
batch_xs,batch_ys=mnist.train.next_batch(batch_size)
sess.run(train_step,feed_dict={x:batch_xs,y:batch_ys})
acc=sess.run(accuracy,feed_dict={x:mnist.test.images,y:mnist.test.labels})
print("Iter "+str(epoch)+", Testing Accuracy "+str(acc))
这里我们设置batch_size和n_batch为:
1
2
batch_size=100
n_batch=mnist.train.num_examples // batch_size
关于mini-batch的介绍:【深度学习基础】第十五课:mini-batch梯度下降法。
函数mnist.train.next_batch(batch_size)用于读取下一个mini-batch。
迭代过程见下: