本文为原创文章,未经本人允许,禁止转载。转载请注明出处。
1.验证码的生成
首先安装一个专门用于生成图形验证码和语音验证码的python第三方库:captcha。
1
pip install captcha
验证码生成的示例代码见下:
1
2
3
4
from captcha.image import ImageCaptcha
image = ImageCaptcha()
captcha = image.generate('1316') #生成1316的验证码
image.write('1316', 'captcha/images/1316.jpg') #将生成的验证码保存为图片
1
2
3
4
5
6
7
8
class ImageCaptcha(_Captcha):
	def __init__(self, width=160, height=60, fonts=None, font_sizes=None):
		self._width = width
		self._height = height
		self._fonts = fonts or DEFAULT_FONTS
		self._font_sizes = font_sizes or (42, 50, 56)
		self._truefonts = []
	#......
生成的验证码图片默认大小为$160 \times 60$。
完整代码见:链接。
2.生成tfrecord文件
请参考博客:【Tensorflow基础】第十一课:TFRecord的生成。
1
2
3
4
5
6
7
8
9
10
11
12
13
14
15
16
17
18
def int64_feature(values):
    if not isinstance(values, (tuple, list)):
        values = [values]
    return tf.train.Feature(int64_list=tf.train.Int64List(value=values))


def bytes_feature(values):
    return tf.train.Feature(bytes_list=tf.train.BytesList(value=[values]))


def image_to_tfexample(image_data, label0, label1, label2, label3):
    return tf.train.Example(features=tf.train.Features(feature={
        'image': bytes_feature(image_data),
        'label0': int64_feature(label0),
        'label1': int64_feature(label1),
        'label2': int64_feature(label2),
        'label3': int64_feature(label3),
    }))
完整代码见:链接。
3.验证码识别模型
基于AlexNet构建验证码识别模型。因为我们的例子中验证码有4位,所以我们将AlexNet的FC8改为4个并行的全连接层,每个并行分支的输出有10个神经元,对应0~9的one-hot编码。
我们所修改的AlexNet是基于Tensorflow官方提供的版本:链接。我们修改后的版本见:alexnet.py。
首先我们需要定义一个函数从第2部分生成的tfrecord文件中把数据读取出来:
1
2
3
4
5
6
7
8
9
10
11
12
13
14
15
16
17
18
19
20
21
22
23
24
25
26
27
28
29
30
# 从tfrecord读出数据
def read_and_decode(filename):
    # 根据文件名生成一个队列
    filename_queue = tf.train.string_input_producer([filename])
    reader = tf.TFRecordReader()
    # 返回文件名和文件
    _, serialized_example = reader.read(filename_queue)
    features = tf.parse_single_example(serialized_example,
                                       features={
                                           'image': tf.FixedLenFeature([], tf.string),
                                           'label0': tf.FixedLenFeature([], tf.int64),
                                           'label1': tf.FixedLenFeature([], tf.int64),
                                           'label2': tf.FixedLenFeature([], tf.int64),
                                           'label3': tf.FixedLenFeature([], tf.int64),
                                       })
    # 获取图片数据
    image = tf.decode_raw(features['image'], tf.unit8)
    # tf.train.shuffle_batch必须确定shape
    image = tf.reshape(image, [224, 224])
    # 图片预处理
    image = tf.cast(image, tf.float32) / 255.0
    image = tf.subtract(image, 0.5)
    image = tf.multiply(image, 2.0)
    # 获取label
    label0 = tf.cast(features['label0'], tf.int32)
    label1 = tf.cast(features['label1'], tf.int32)
    label2 = tf.cast(features['label2'], tf.int32)
    label3 = tf.cast(features['label3'], tf.int32)

    return image, label0, label1, label2, label3
从TFRecords文件中读取数据,首先需要用tf.train.string_input_producer生成一个解析队列。之后调用tf.TFRecordReader的tf.parse_single_example解析器。
解析器首先读取解析队列,返回serialized_example对象,之后调用tf.parse_single_example操作将Example协议缓冲区(protocol buffer)解析为张量。
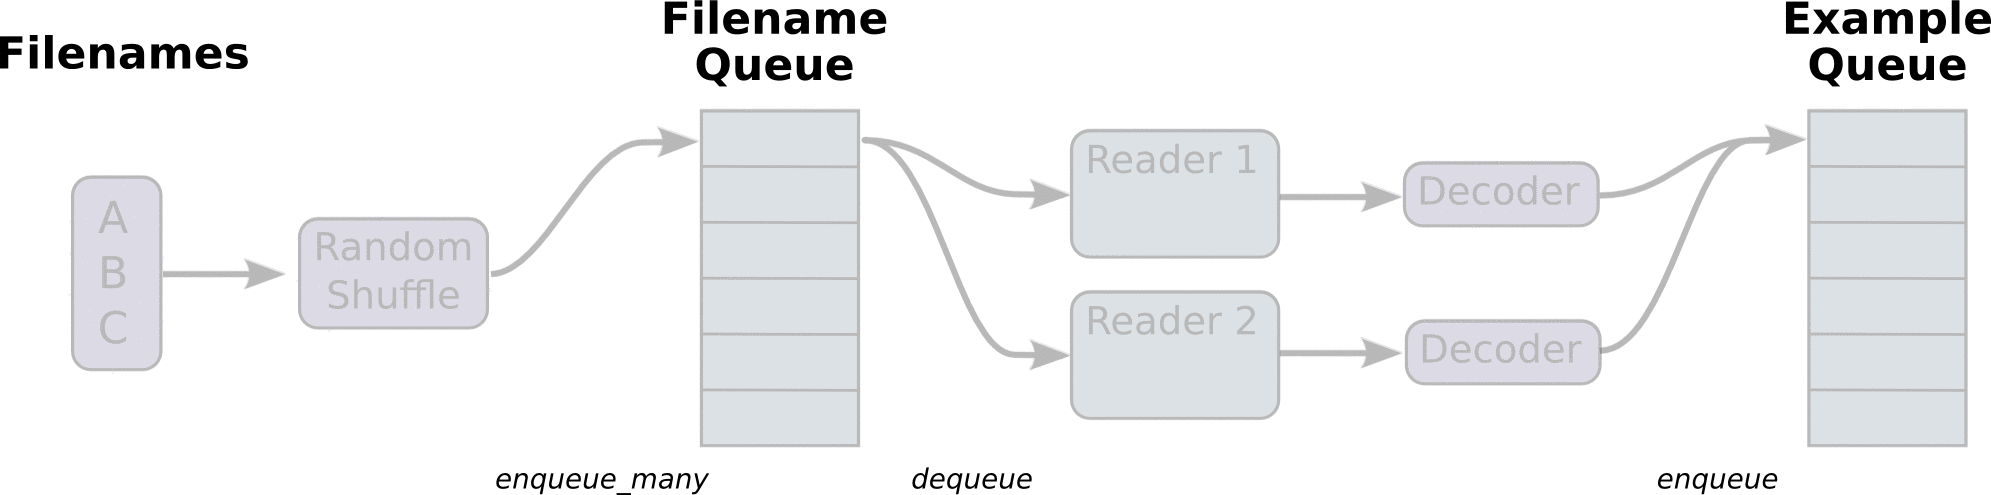
在生成tfrecord时,我们将图片存为tf.train.BytesList的形式,也就是字符串,所以这里使用tf.decode_raw将原来编码为字符串类型的变量重新变回来。tf.cast在这里的作用也类似,用于数据类型的转变。
将数据的顺序打乱:
1
2
3
image_batch, label_batch0, label_batch1, label_batch2, label_batch3 = tf.train.shuffle_batch(
    [image, label0, label1, label2, label3], batch_size=BATCH_SIZE,
    capacity=50000, min_after_dequeue=10000, num_threads=1)
tf.train.shuffle_batch(tensors,batch_size,capacity,min_after_dequeue,num_threads)是将队列中的数据随机打乱后再读取出来:
tensors:一个列表或字典的tensor用来进行入队。batch_size:每次从队列中获取出队数据的数量。capacity:一个整数,用来设置队列中元素的最大数量。min_after_dequeue:出队后队列中元素的最小数量,用于确保元素的混合级别,这个参数必须小于capacity。num_threads:用来控制入队tensors线程的数量。
对应的,tf.train.batch()可以按顺序读取队列中的数据。
定义网络结构(调用官方现成的模型):
1
2
3
4
5
6
# 定义网络结构
train_network_fn = nets_factory.get_network_fn(
    'alexnet_v2',
    num_classes=CHAR_SET_LEN,
    weight_decay=0.0005,
    is_training=True)
完整代码见:链接。
完整代码中会用到的一些API的解释:
👉tf.one_hot()函数用于将输入转化成one-hot编码。
4.模型测试
代码大部分和第3部分一样,完整代码请见:链接。