【从零开始构建大语言模型】系列博客为”Build a Large Language Model (From Scratch)”一书的个人读书笔记。
- 原书链接:Build a Large Language Model (From Scratch)。
- 官方示例代码:LLMs-from-scratch。
本文为原创文章,未经本人允许,禁止转载。转载请注明出处。
1.Working with text data
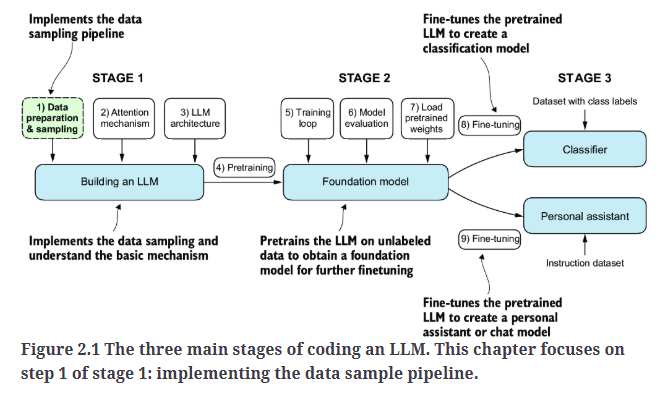
如Fig2.1所示,本篇主要介绍第一个阶段中的第一步:数据准备和采样。
2.Understanding word embeddings
对word embedding的详细讲解,请移步:【深度学习基础】第四十五课:自然语言处理与词嵌入。
将数据转换为向量格式的概念通常被称为嵌入(embedding)。我们可以使用特定的神经网络层或其他预训练的神经网络模型来对不同类型的数据进行嵌入,例如视频、音频和文本,如Fig2.2所示。然而,需要注意的是,不同的数据格式需要不同的嵌入模型。例如,专为文本设计的嵌入模型并不适用于音频或视频数据的嵌入。
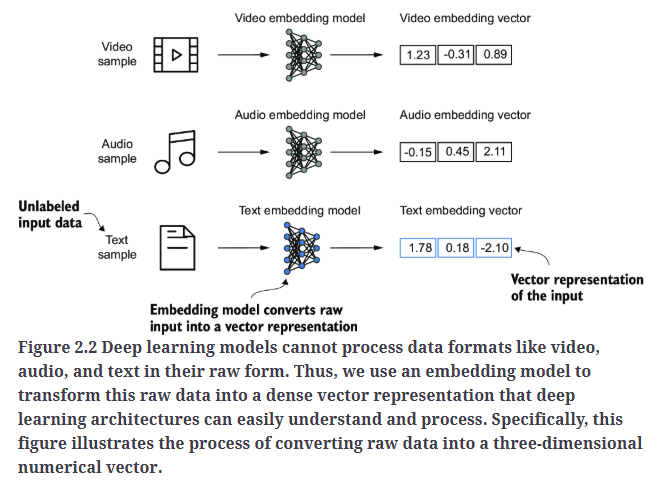
深度学习模型无法直接处理视频、音频和文本等数据格式的原始形式。因此,我们使用嵌入模型(embedding model)将这些原始数据转换为稠密向量表示,使深度学习架构能够轻松理解和处理。具体来说,Fig2.2展示了将原始数据转换为三维数值向量的过程。
虽然词嵌入(word embedding)是最常见的文本嵌入形式,但也存在针对句子、段落或整篇文档的嵌入。句子嵌入或段落嵌入在检索增强生成(retrieval-augmented generation,RAG) 中非常流行。检索增强生成结合了生成(如生成文本)和检索(如搜索外部知识库),在生成文本时提取相关信息。然而,本系列博文不会过多讨论RAG。由于我们的目标是训练类似GPT的LLM,它们是逐词生成文本的,因此我们将专注于词嵌入。
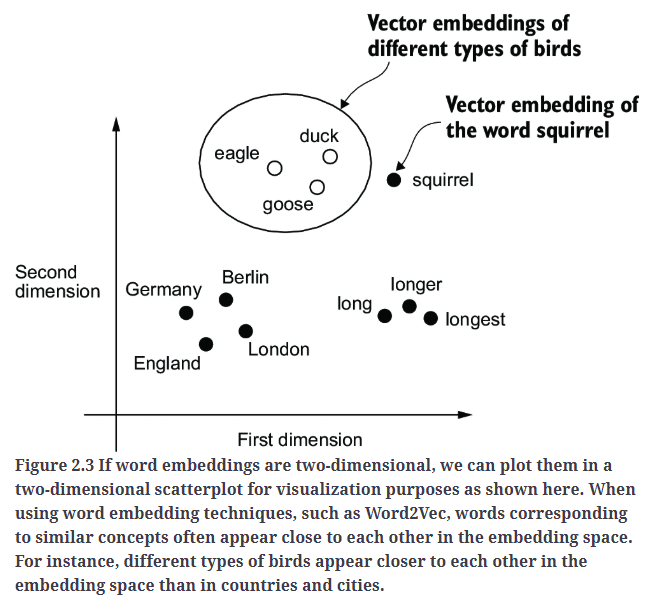
已经开发了多种算法和框架来生成词嵌入。其中较早且最受欢迎的方法之一是Word2Vec。Word2Vec通过神经网络架构训练词嵌入,其原理是根据目标词预测上下文,或根据上下文预测目标词。Word2Vec的核心思想是:出现在相似上下文中的单词往往具有相似的含义。因此,当词嵌入被投影到二维空间进行可视化时,语义相近的词会聚类在一起,如Fig2.3所示。
词嵌入的维度可以不同,范围从一维到数千维。更高的维度可能会捕捉到更细微的语义关系,但计算效率会相应降低。
虽然我们可以使用Word2Vec等预训练模型来为机器学习模型生成嵌入,但LLM通常会生成自身的嵌入,这些嵌入是输入层的一部分,并在训练过程中不断更新。与使用Word2Vec相比,将嵌入作为LLM训练的一部分进行优化的优势在于:嵌入能够针对特定任务和数据进行优化。
不幸的是,高维嵌入在可视化方面存在挑战,因为人类的感官感知和常见的图形表示通常限制在三维或更低的维度。这也是为什么Fig2.3采用二维散点图来展示二维嵌入。然而,在处理LLM时,我们通常使用更高维度的嵌入。对于GPT-2和GPT-3,嵌入大小取决于具体的模型变体和规模,在性能和计算效率之间需要权衡。举例来说:最小的GPT-2模型(117M和125M参数)使用768维的嵌入大小。最大的GPT-3模型(175B参数)使用12,288维的嵌入大小。
3.Tokenizing text
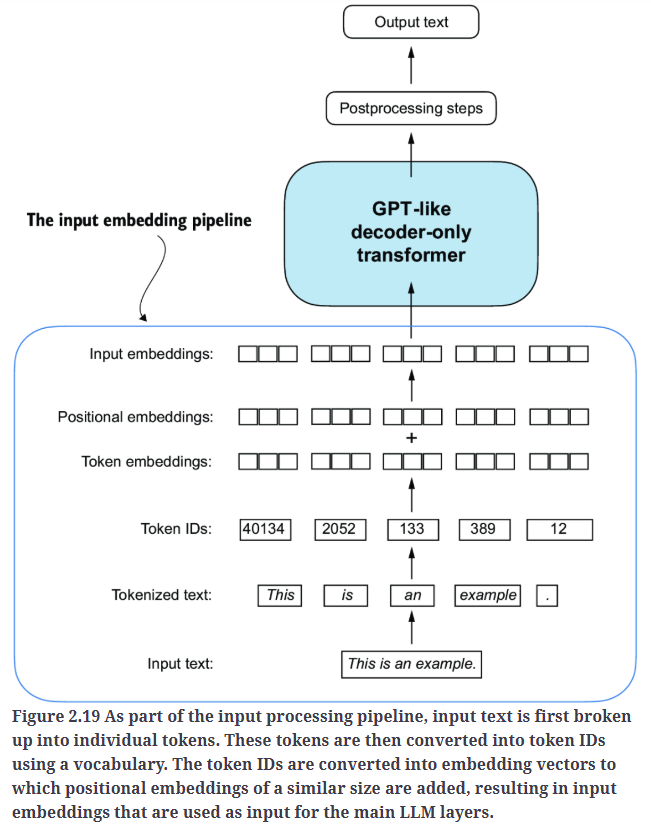
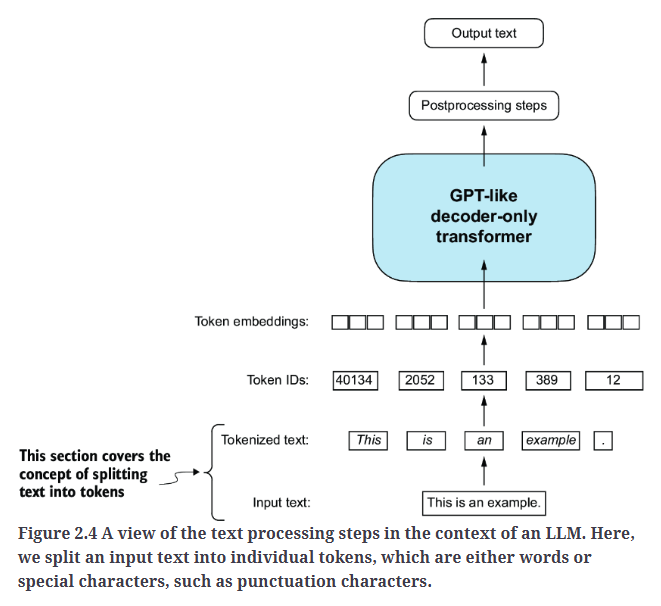
首先,我们需要将文本拆分为单独的token,这是为LLM创建嵌入所必需的预处理步骤。token可以是单个单词或特殊字符(包括标点符号),如Fig2.4所示。
作为一个例子,我们先加载一个文本"the-verdict.txt":
1
2
3
4
5
with open("the-verdict.txt", "r", encoding="utf-8") as f:
    raw_text = f.read()

print("Total number of character:", len(raw_text))
print(raw_text[:99])
输出为:
1
2
Total number of character: 20479
I HAD always thought Jack Gisburn rather a cheap genius--though a good fellow enough--so it was no
需要注意的是,我们不会将所有文本转换为小写,因为大写字母可以帮助LLM区分专有名词和普通名词、理解句子结构、生成符合语法规范的文本。
注意在开发简单的分词器(tokenizer)时,是否应将空格编码为单独的字符,还是直接去除,取决于具体的应用需求。去除空格可以降低内存占用和计算需求。保留空格在某些情况下很有用,例如训练对文本结构敏感的模型(比如Python代码,它对缩进和空格敏感)。
在这个例子中,我们使用Python的正则表达式库(re)实现一个简单的分词器,比如:
1
2
3
4
5
text = "Hello, world. Is this-- a test?"

result = re.split(r'([,.:;?_!"()\']|--|\s)', text)
result = [item.strip() for item in result if item.strip()]
print(result)
输出为:
1
['Hello', ',', 'world', '.', 'Is', 'this', '--', 'a', 'test', '?']
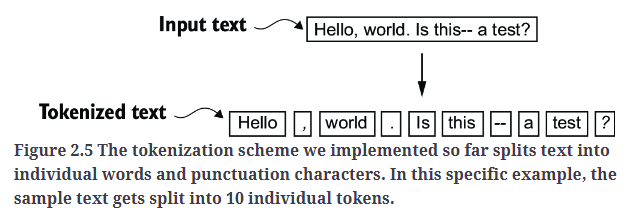
如Fig2.5所示,这句话被分成了10个token。
然后我们将这个简单的分词器应用于文本"the-verdict.txt",文本一共被分成了4690个token(不包含空格):
1
2
3
preprocessed = re.split(r'([,.:;?_!"()\']|--|\s)', raw_text)
preprocessed = [item.strip() for item in preprocessed if item.strip()]
print(preprocessed[:30])
输出前30个token为:
1
['I', 'HAD', 'always', 'thought', 'Jack', 'Gisburn', 'rather', 'a', 'cheap', 'genius', '--', 'though', 'a', 'good', 'fellow', 'enough', '--', 'so', 'it', 'was', 'no', 'great', 'surprise', 'to', 'me', 'to', 'hear', 'that', ',', 'in']
4.Converting tokens into token IDs
接下来,让我们将这些token从Python字符串转换为整数表示,以生成token ID。此转换是一个中间步骤,后续会将token ID转换为嵌入向量。
首先需要构建一个词汇表(vocabulary),该词汇表定义了如何将每个单词和特殊字符映射到唯一的整数,如Fig2.6所示。
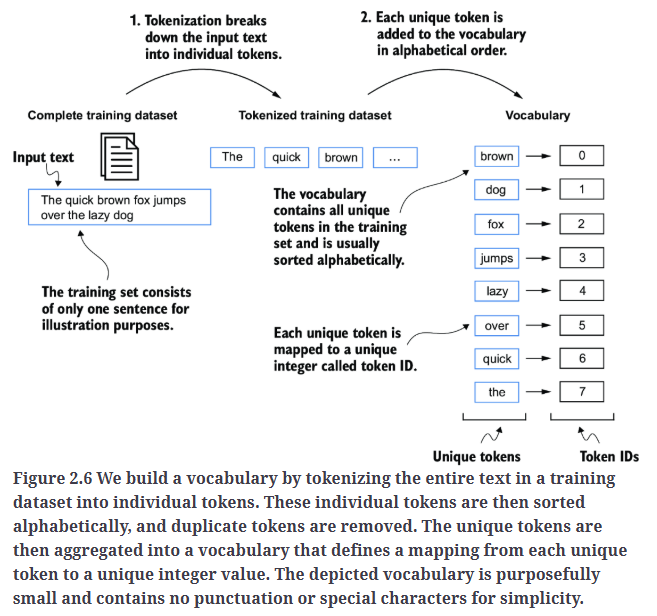
按照这个思路,我们对文本"the-verdict.txt"生成的token进行去重(去重后,单词和特殊符号一共1130个),然后按照字母排序来赋予其对应的ID,从而构建词汇表:
1
2
3
4
5
6
7
8
9
all_words = sorted(set(preprocessed))
vocab_size = len(all_words) #vocab_size: 1130

vocab = {token:integer for integer,token in enumerate(all_words)}

for i, item in enumerate(vocab.items()):
    print(item)
    if i >= 50:
        break
输出词汇表中的前50个词汇或特殊符号以及其对应的ID:
1
2
3
4
5
6
7
8
9
10
11
12
13
14
15
16
17
18
19
20
21
22
23
24
25
26
27
28
29
30
('!', 0)
('"', 1)
("'", 2)
('(', 3)
(')', 4)
(',', 5)
('--', 6)
('.', 7)
(':', 8)
(';', 9)
('?', 10)
('A', 11)
('Ah', 12)
('Among', 13)
('And', 14)
('Are', 15)
('Arrt', 16)
('As', 17)
('At', 18)
('Be', 19)
('Begin', 20)
('Burlington', 21)
('But', 22)
('By', 23)
('Carlo', 24)
...
('Has', 47)
('He', 48)
('Her', 49)
('Hermia', 50)
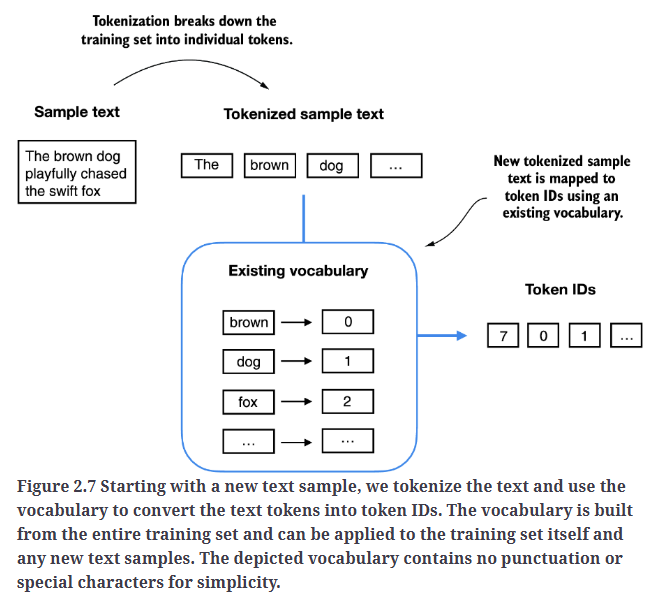
下一步便是利用这个词汇表,将文本转换为token ID,如Fig2.7所示。
当我们需要将LLM的输出从数字转换回文本时,我们需要一种方法将token ID转换回文本。为此,我们可以创建词汇表的逆映射版本,将token ID映射回对应的文本。
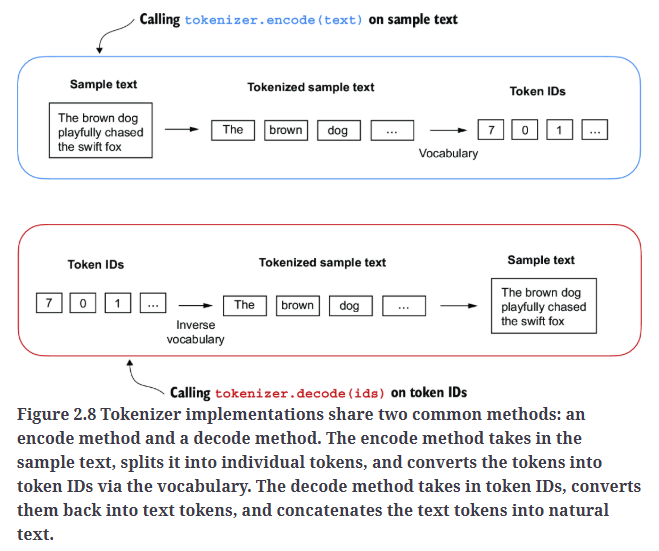
让我们在Python中实现一个完整的分词器类,其包含encode和decode。encode将文本拆分为token,并通过词汇表生成对应的token ID。decode将token ID转换回文本。
1
2
3
4
5
6
7
8
9
10
11
12
13
14
15
16
17
18
19
class SimpleTokenizerV1:
    def __init__(self, vocab):
        self.str_to_int = vocab #Stores the vocabulary as a class attribute for access in the encode and decode methods
        self.int_to_str = {i:s for s,i in vocab.items()} #Creates an inverse vocabulary that maps token IDs back to the original text tokens

    def encode(self, text): #Processes input text into token IDs
        preprocessed = re.split(r'([,.:;?_!"()\']|--|\s)', text)

        preprocessed = [
            item.strip() for item in preprocessed if item.strip()
        ]
        ids = [self.str_to_int[s] for s in preprocessed]
        return ids

    def decode(self, ids): #Converts token IDs back into text
        text = " ".join([self.int_to_str[i] for i in ids])

        text = re.sub(r'\s+([,.?!"()\'])', r'\1', text) #Removes spaces before the specified punctuation
        return text
现在我们就可以使用SimpleTokenizerV1来对文本进行编码和解码了,如Fig2.8所示。
5.Adding special context tokens
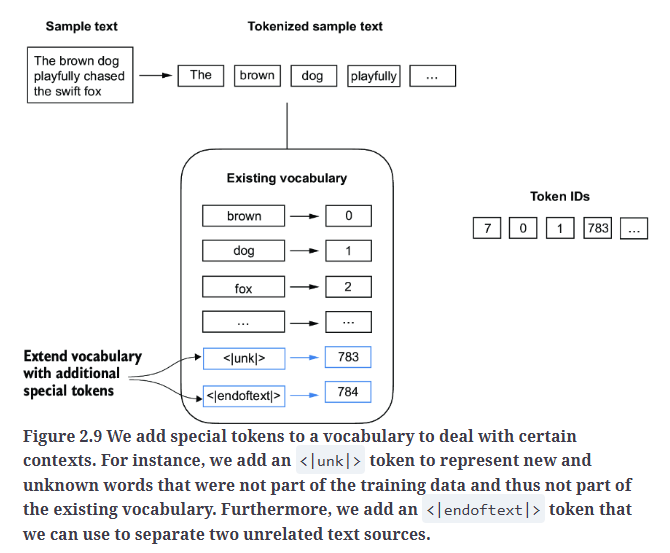
在第4部分,我们基于文本"the-verdict.txt"构建了词汇表,但如果出现词汇表之外的词汇,则分词器SimpleTokenizerV1就会报错。因此,在SimpleTokenizerV2中,我们添加了两个特殊token:<|unk|>(表示未知单词)和<|endoftext|>(表示文档边界,用于分隔两个不相关的文本来源),如Fig2.9所示。
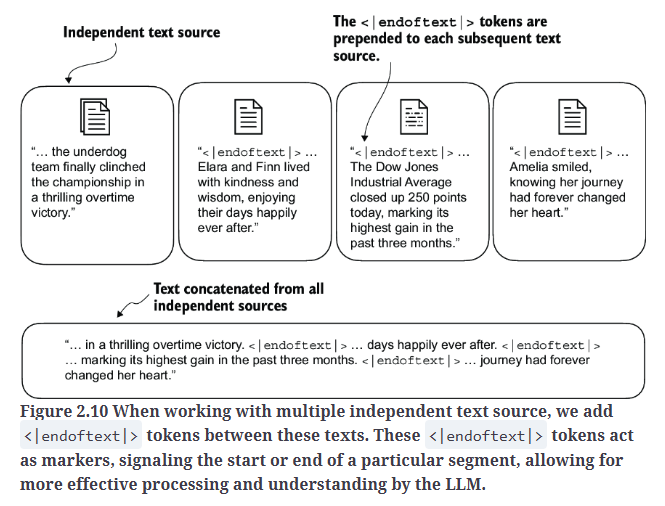
在训练类似GPT的LLM时,通常需要处理多个独立的文档或书籍。在这种情况下,通常会在每个新的文档或书籍开始之前插入一个特殊token,以区分它们与前一个文本来源的不同,如Fig2.10所示。这种方法有助于LLM理解,尽管这些文本在训练时被连接在一起,但它们实际上是不相关的独立文本。
现在我们将这两个特殊token添加到词汇表中:
1
2
3
4
5
6
all_tokens = sorted(list(set(preprocessed)))
all_tokens.extend(["<|endoftext|>", "<|unk|>"])

vocab = {token:integer for integer,token in enumerate(all_tokens)}

len(vocab.items()) #1132
1
2
for i, item in enumerate(list(vocab.items())[-5:]):
    print(item)
输出为:
1
2
3
4
5
('younger', 1127)
('your', 1128)
('yourself', 1129)
('<|endoftext|>', 1130)
('<|unk|>', 1131)
SimpleTokenizerV2的实现如下:
1
2
3
4
5
6
7
8
9
10
11
12
13
14
15
16
17
18
19
20
21
class SimpleTokenizerV2:
    def __init__(self, vocab):
        self.str_to_int = vocab
        self.int_to_str = { i:s for s,i in vocab.items()}

    def encode(self, text):
        preprocessed = re.split(r'([,.:;?_!"()\']|--|\s)', text)
        preprocessed = [item.strip() for item in preprocessed if item.strip()]
        preprocessed = [
            item if item in self.str_to_int #Replaces unknown words by <|unk|> tokens
            else "<|unk|>" for item in preprocessed
        ]

        ids = [self.str_to_int[s] for s in preprocessed]
        return ids

    def decode(self, ids):
        text = " ".join([self.int_to_str[i] for i in ids])

        text = re.sub(r'\s+([,.:;?!"()\'])', r'\1', text) #Replaces spaces before the specified punctuations
        return text
举个例子测试一下:
1
2
3
4
5
6
7
8
9
10
11
12
13
14
15
tokenizer = SimpleTokenizerV2(vocab)

text1 = "Hello, do you like tea?"
text2 = "In the sunlit terraces of the palace."

text = " <|endoftext|> ".join((text1, text2))

print(text)
#Hello, do you like tea? <|endoftext|> In the sunlit terraces of the palace.

tokenizer.encode(text)
#[1131, 5, 355, 1126, 628, 975, 10, 1130, 55, 988, 956, 984, 722, 988, 1131, 7]

tokenizer.decode(tokenizer.encode(text))
#'<|unk|>, do you like tea? <|endoftext|> In the sunlit terraces of the <|unk|>.'
解码后得到的文本称为detokenized text,通过其与原始输入文本比较,我们可以确定文本"the-verdict.txt"中不包含单词”Hello”和”palace”。
根据不同的LLM,一些研究人员还会考虑额外的特殊token,比如:
[BOS](Beginning Of Sequence):用于标记文本的开头,向LLM指示内容的起始位置。[EOS](End Of Sequence):放置在文本的结尾,在连接多个不相关的文本时尤为有用,类似于<|endoftext|>。[PAD](Padding):在训练LLM时,若batch size大于1,则一个batch内的文本可能长度不同。为了确保所有文本具有相同的长度,较短的文本会使用[PAD]填充,直到对齐到batch内最长文本的长度。
GPT模型使用的分词器不需要这些特殊token;它仅使用<|endoftext|>以保持简洁性。<|endoftext|>类似于[EOS],也可用于padding。在批量处理输入时,我们通常会使用mask,这意味着模型不会关注padding的token。因此,选择哪种padding token实际上并不重要。
此外,GPT模型使用的分词器也不使用<|unk|>来处理超出词汇表的单词。相反,GPT模型使用字节对编码(byte pair encoding,BPE) 分词器,它会将单词拆分为子词单元(subword units)。
6.Byte pair encoding
由于BPE的实现相对复杂,所以我们直接使用一个现有的Python开源库:tiktoken。
获取GPT-2所用的分词器:
1
tokenizer = tiktoken.get_encoding("gpt2")
对文本进行编码:
1
2
3
4
5
6
7
8
text = (
    "Hello, do you like tea? <|endoftext|> In the sunlit terraces"
     "of someunknownPlace."
)

integers = tokenizer.encode(text, allowed_special={"<|endoftext|>"})

print(integers)
输出为:
1
[15496, 11, 466, 345, 588, 8887, 30, 220, 50256, 554, 262, 4252, 18250, 8812, 2114, 1659, 617, 34680, 27271, 13]
再对token ID进行解码:
1
2
3
strings = tokenizer.decode(integers)

print(strings)
输出为:
1
Hello, do you like tea? <|endoftext|> In the sunlit terracesof someunknownPlace.
根据token ID和解码后的文本,我们可以得到两个重要的观察结果。第一,<|endoftext|>被分配了一个相对较大的token ID,即50256。事实上,GPT-2、GPT-3以及最初的ChatGPT所用的词汇表大小为50257,也就是说,<|endoftext|>拥有最大的token ID。
第二,BPE分词器能够正确的对未知单词,如”someunknownPlace”,进行编码和解码。BPE分词器能够处理任何未知的单词。它是怎么在不使用<|unk|> token的情况下处理未知单词的呢?
BPE算法的核心机制是:将不在预定义词汇表中的单词拆分为更小的子词单元或单个字符,从而使其能够处理超出词汇表的单词。如Fig2.11所示。
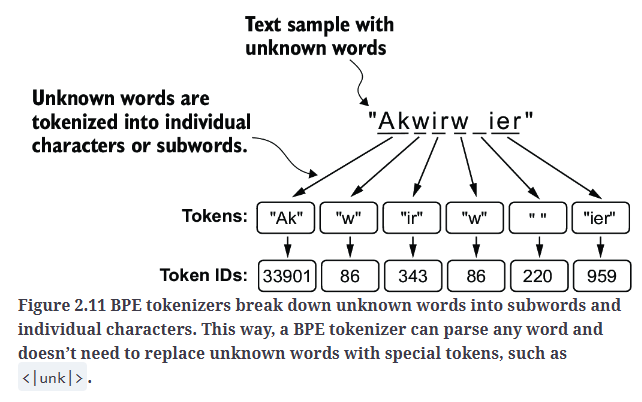
用代码验证下Fig2.11:
1
2
3
4
5
6
7
8
9
10
11
text = (
    "Akwirw ier"
)

integers = tokenizer.encode(text, allowed_special={"<|endoftext|>"})

print(integers) #[33901, 86, 343, 86, 220, 959]

strings = tokenizer.decode(integers)

print(strings) #Akwirw ier
BPE的基本原理:
- 首先,词汇表会包含所有单个字符,比如”a”、”b”等。
- 然后,频繁一起出现的字符会被合并为子词。比如,”d”和”e”可能会被合并为子词”de”,因为它在很多英文单词(比如”define”、”depend”、”made”、”hidden”等)中都很常见。
- 合并高频子词这一过程会继续进行,将高频子词合并成完整的单词。合并的标准通常由频率阈值决定。
7.Data sampling with a sliding window
在为LLM创建嵌入的下一步中,我们需要生成训练LLM所需的输入-目标对(input–target pairs)。如Fig2.12所示。
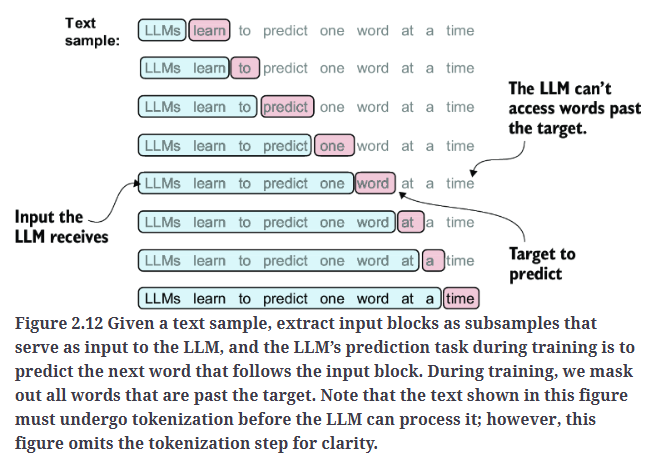
Fig2.12中需要注意两点,一是在训练过程中,目标单词之后的内容会被mask,LLM无法访问;二是LLM只能处理分词后的数据,为了简化,示意图中省去了分词步骤。
接下来,我们实操一下,通过滑动窗口的方法,从训练数据集中提取输入-目标对。首先使用BPE对文本"the-verdict.txt"进行分词:
1
2
3
4
5
with open("the-verdict.txt", "r", encoding="utf-8") as f:
    raw_text = f.read()

enc_text = tokenizer.encode(raw_text)
print(len(enc_text)) #5145
然后,我们移除了数据集中的前50个token,这样在后续步骤中可以得到更具代表性的文本片段:
1
enc_sample = enc_text[50:]
这里我看了下前50个token的内容:
1
2
for i in range(50):
    print(enc_text[i], "->",tokenizer.decode([enc_text[i]]))
输出为:
1
2
3
4
5
6
7
8
9
10
11
12
13
14
15
16
17
18
19
20
21
22
23
24
25
26
27
28
29
30
40 -> I
367 ->  H
2885 -> AD
1464 ->  always
1807 ->  thought
3619 ->  Jack
402 ->  G
271 -> is
10899 -> burn
2138 ->  rather
257 ->  a
7026 ->  cheap
15632 ->  genius
438 -> --
2016 -> though
257 ->  a
922 ->  good
5891 ->  fellow
1576 ->  enough
438 -> --
568 -> so
340 ->  it
373 ->  was
645 ->  no
1049 ->  great
...
257 ->  a
5527 ->  rich
27075 ->  widow
11 -> ,
也就是文本"the-verdict.txt"的开头几句话:”I HAD always thought Jack Gisburn rather a cheap genius–though a good fellow enough–so it was no great surprise to me to hear that, in the height of his glory, he had dropped his painting, married a rich widow,”。从算法层面来说,去不去掉前50个token都无所谓。
1
2
3
4
5
6
7
context_size = 4 #The context size determines how many tokens are included in the input.

x = enc_sample[:context_size]
y = enc_sample[1:context_size+1]

print(f"x: {x}")
print(f"y:      {y}")
输出为:
1
2
x: [290, 4920, 2241, 287]
y:      [4920, 2241, 287, 257]
构建输入-目标对:
1
2
3
4
5
for i in range(1, context_size+1):
    context = enc_sample[:i]
    desired = enc_sample[i]

    print(context, "---->", desired)
输出为:
1
2
3
4
[290] ----> 4920
[290, 4920] ----> 2241
[290, 4920, 2241] ----> 287
[290, 4920, 2241, 287] ----> 257
将token ID转换回文本看下:
1
2
3
4
5
for i in range(1, context_size+1):
    context = enc_sample[:i]
    desired = enc_sample[i]

    print(tokenizer.decode(context), "---->", tokenizer.decode([desired]))
输出为:
1
2
3
4
 and ---->  established
 and established ---->  himself
 and established himself ---->  in
 and established himself in ---->  a
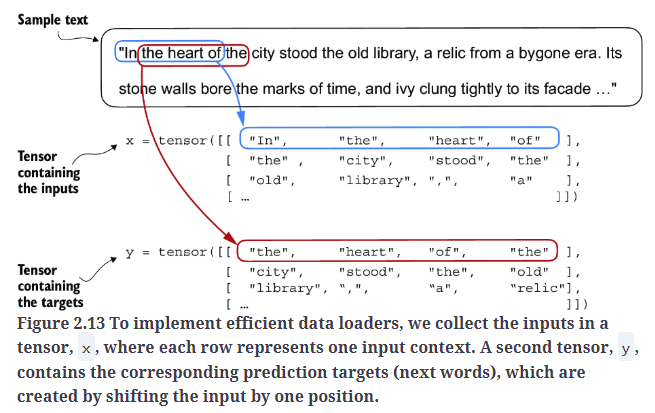
在将token转换为嵌入之前,还有最后一个任务:我们需要实现一个高效的数据加载器,它可以遍历输入数据集,并以Pytorch tensor的形式返回输入和目标。具体如Fig2.13所示。
1
2
3
4
5
6
7
8
9
10
11
12
13
14
15
16
17
18
19
20
21
22
23
24
25
26
27
28
#A dataset for batched inputs and targets

import torch
from torch.utils.data import Dataset, DataLoader


class GPTDatasetV1(Dataset):
    def __init__(self, txt, tokenizer, max_length, stride):
        self.input_ids = []
        self.target_ids = []

        # Tokenize the entire text
        token_ids = tokenizer.encode(txt, allowed_special={"<|endoftext|>"})

        # Use a sliding window to chunk the book into overlapping sequences of max_length
        for i in range(0, len(token_ids) - max_length, stride):
            input_chunk = token_ids[i:i + max_length]
            target_chunk = token_ids[i + 1: i + max_length + 1]
            self.input_ids.append(torch.tensor(input_chunk))
            self.target_ids.append(torch.tensor(target_chunk))

    #Returns the total number of rows in the dataset
    def __len__(self):
        return len(self.input_ids)

    #Returns a single row from the dataset
    def __getitem__(self, idx):
        return self.input_ids[idx], self.target_ids[idx]
通过Pytorch DataLoader,使用GPTDatasetV1批量加载输入数据:
1
2
3
4
5
6
7
8
9
10
11
12
13
14
15
16
17
18
19
20
def create_dataloader_v1(txt, batch_size=4, max_length=256,
                         stride=128, shuffle=True, drop_last=True,
                         num_workers=0):

    # Initialize the tokenizer
    tokenizer = tiktoken.get_encoding("gpt2")

    # Create dataset
    dataset = GPTDatasetV1(txt, tokenizer, max_length, stride)

    # Create dataloader
    dataloader = DataLoader(
        dataset,
        batch_size=batch_size,
        shuffle=shuffle,
        drop_last=drop_last, #drop_last=True drops the last batch if it is shorter than the specified batch_size to prevent loss spikes during training.
        num_workers=num_workers #The number of CPU processes to use for preprocessing
    )

    return dataloader
实际调用测试:
1
2
3
4
5
6
7
8
9
10
11
12
with open("the-verdict.txt", "r", encoding="utf-8") as f:
    raw_text = f.read()
dataloader = create_dataloader_v1(
    raw_text, batch_size=1, max_length=4, stride=1, shuffle=False
)

#Converts dataloader into a Python iterator to fetch the next entry via Python’s built-in next() function
data_iter = iter(dataloader)
first_batch = next(data_iter)
print(first_batch) #[tensor([[  40,  367, 2885, 1464]]), tensor([[ 367, 2885, 1464, 1807]])]
second_batch = next(data_iter)
print(second_batch) #[tensor([[ 367, 2885, 1464, 1807]]), tensor([[2885, 1464, 1807, 3619]])]
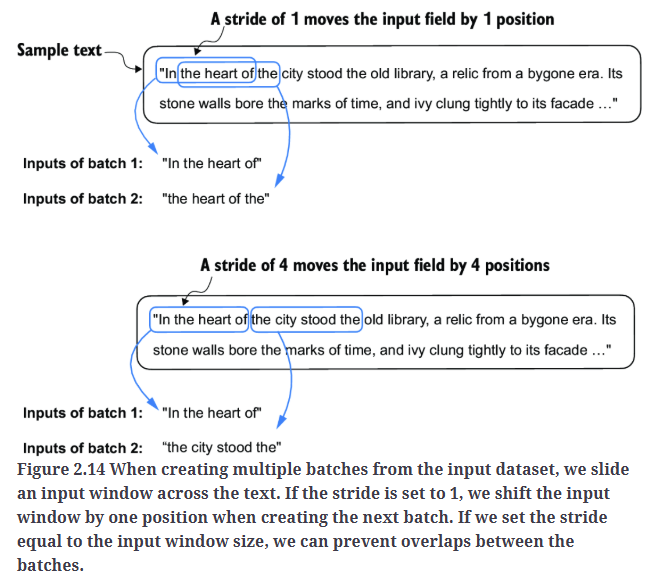
在实际训练LLM时,max_length通常至少为256。stride的作用如Fig2.14所示。
另一个不同参数的例子:
1
2
3
4
5
6
dataloader = create_dataloader_v1(raw_text, batch_size=8, max_length=4, stride=4, shuffle=False)

data_iter = iter(dataloader)
inputs, targets = next(data_iter)
print("Inputs:\n", inputs)
print("\nTargets:\n", targets)
输出为:
1
2
3
4
5
6
7
8
9
10
11
12
13
14
15
16
17
18
19
Inputs:
 tensor([[   40,   367,  2885,  1464],
        [ 1807,  3619,   402,   271],
        [10899,  2138,   257,  7026],
        [15632,   438,  2016,   257],
        [  922,  5891,  1576,   438],
        [  568,   340,   373,   645],
        [ 1049,  5975,   284,   502],
        [  284,  3285,   326,    11]])

Targets:
 tensor([[  367,  2885,  1464,  1807],
        [ 3619,   402,   271, 10899],
        [ 2138,   257,  7026, 15632],
        [  438,  2016,   257,   922],
        [ 5891,  1576,   438,   568],
        [  340,   373,   645,  1049],
        [ 5975,   284,   502,   284],
        [ 3285,   326,    11,   287]])
8.Creating token embeddings
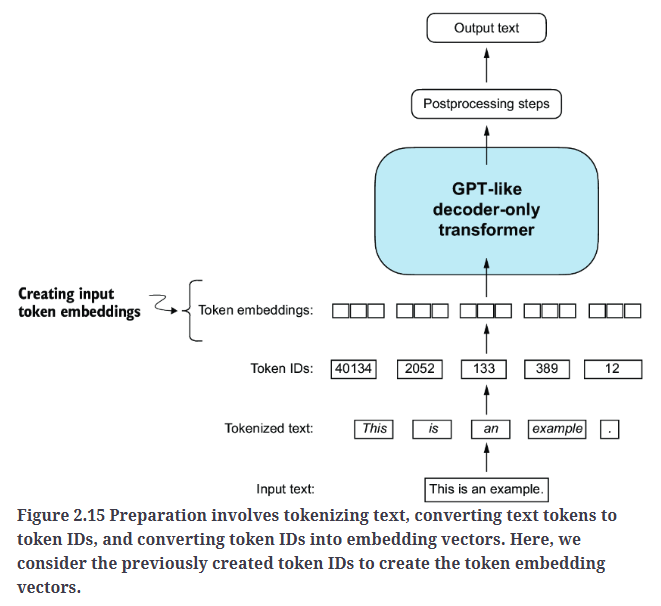
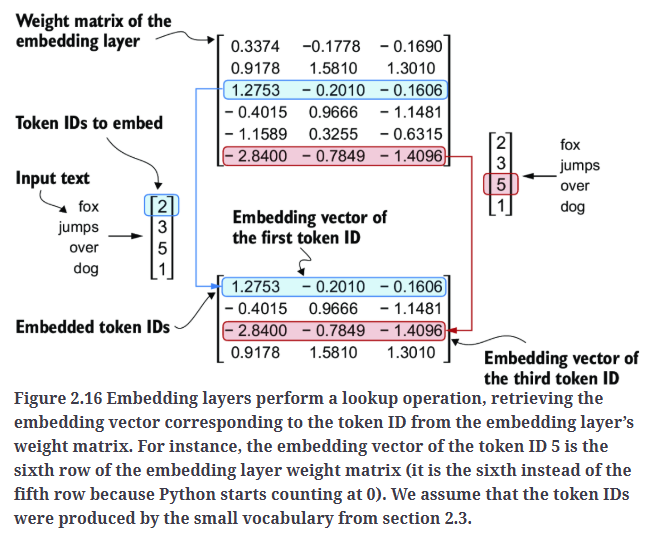
为LLM训练准备输入文本的最后一步是将token ID转换为嵌入向量,如Fig2.15所示。作为预处理步骤,我们会随机初始化这些嵌入权重。在LLM训练阶段,我们将优化嵌入权重。
通过一个例子来看下token ID如何转换为嵌入向量。假设我们有4个token ID:
1
input_ids = torch.tensor([2, 3, 5, 1])
为了简化,假设我们有一个仅包含6个单词的词汇表,而我们希望创建维度为3的嵌入向量:
1
2
3
4
5
6
7
vocab_size = 6
output_dim = 3

torch.manual_seed(123)
embedding_layer = torch.nn.Embedding(vocab_size, output_dim)

print(embedding_layer.weight)
输出嵌入层的随机初始化权重矩阵:
1
2
3
4
5
6
7
Parameter containing:
tensor([[ 0.3374, -0.1778, -0.1690],
        [ 0.9178,  1.5810,  1.3010],
        [ 1.2753, -0.2010, -0.1606],
        [-0.4015,  0.9666, -1.1481],
        [-1.1589,  0.3255, -0.6315],
        [-2.8400, -0.7849, -1.4096]], requires_grad=True)
权重矩阵包含小的随机值。这些值会在LLM训练过程中进行优化。权重矩阵的每一行对应一个token,每一列代表一个维度。
我们可以输入token ID获取对应的嵌入向量:
1
print(embedding_layer(input_ids))
输出为:
1
2
3
4
tensor([[ 1.2753, -0.2010, -0.1606],
        [-0.4015,  0.9666, -1.1481],
        [-2.8400, -0.7849, -1.4096],
        [ 0.9178,  1.5810,  1.3010]], grad_fn=<EmbeddingBackward0>)
现在,我们已经从token ID创建了嵌入向量,接下来我们将对这些嵌入向量进行一个小的修改,以编码token在文本中的位置信息。
9.Encoding word positions
LLM存在一个小缺陷:它们的自注意力机制无法感知token在序列中的位置或顺序。在之前介绍的嵌入层中,相同的token ID总是映射到相同的向量表示,无论它在输入序列中的位置如何,如Fig2.17所示。

为了解决这个问题,我们可以使用两种位置感知嵌入(position-aware embeddings)方法:相对位置嵌入和绝对位置嵌入。绝对位置嵌入直接与序列中的特定位置相关联,对于输入序列中的每个位置,都会有一个唯一的位置嵌入向量,如Fig2.18所示。
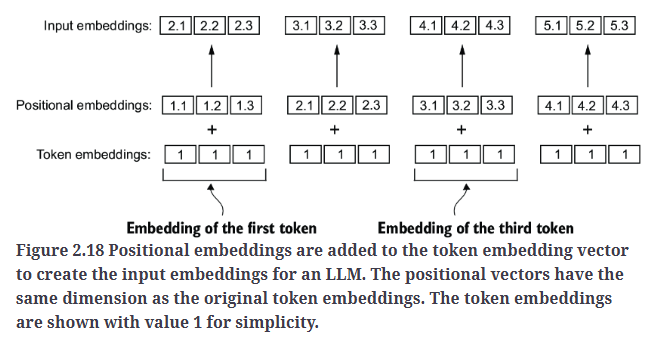
相对位置嵌入不关注token的绝对位置,而是强调token之间的相对位置或距离。这意味着模型学习的是token之间的距离,而不是token的具体位置。这种方法的优势在于使模型能够更好地泛化到不同长度的序列,即使在训练中从未见过该长度的序列,模型仍然可以适应。
这两种位置嵌入方法的目标都是增强LLM对token顺序和关系的理解能力,从而实现更准确且具备上下文感知的预测。选择哪种方法通常取决于具体的应用场景以及所处理数据的特性。
OpenAI的GPT模型使用的是绝对位置嵌入,不同于原始transformer模型中固定或预定义的位置编码,GPT模型的位置嵌入会在训练过程中进行优化。这一优化也是模型训练的一部分。现在,我们先创建初始位置嵌入,用于生成LLM的输入。
接下来为了演示,我们设置嵌入向量的维度为256,token ID由之前的BPE分词器生成,其词汇表大小为50257。
1
2
3
4
5
6
7
8
9
10
11
12
13
14
15
vocab_size = 50257
output_dim = 256

token_embedding_layer = torch.nn.Embedding(vocab_size, output_dim)

max_length = 4
dataloader = create_dataloader_v1(
    raw_text, batch_size=8, max_length=max_length,
    stride=max_length, shuffle=False
)
data_iter = iter(dataloader)
inputs, targets = next(data_iter)

print("Token IDs:\n", inputs)
print("\nInputs shape:\n", inputs.shape)
输出为:
1
2
3
4
5
6
7
8
9
10
11
12
Token IDs:
 tensor([[   40,   367,  2885,  1464],
        [ 1807,  3619,   402,   271],
        [10899,  2138,   257,  7026],
        [15632,   438,  2016,   257],
        [  922,  5891,  1576,   438],
        [  568,   340,   373,   645],
        [ 1049,  5975,   284,   502],
        [  284,  3285,   326,    11]])

Inputs shape:
 torch.Size([8, 4])
将输入的token ID转换为嵌入向量:
1
2
token_embeddings = token_embedding_layer(inputs)
print(token_embeddings.shape) #torch.Size([8, 4, 256])
按照GPT模型的绝对位置嵌入方法,我们需要创建另一个嵌入层,其嵌入维度与token_embedding_ layer相同:
1
2
3
4
context_length = max_length
pos_embedding_layer = torch.nn.Embedding(context_length, output_dim)
pos_embeddings = pos_embedding_layer(torch.arange(context_length))
print(pos_embeddings.shape) #torch.Size([4, 256])
pos_embeddings的输入通常是一个占位符向量torch.arange(context_length),其中包含从0到最大输入长度-1的数字序列(即0,1,...,max_length-1)。context_length是一个变量,表示LLM支持的最大输入长度。在这里,我们选择的context_length与输入文本的最大长度相近。在实际应用中,如果输入文本长度超过支持的context_length,则需要截断文本以适应模型输入限制。
1
2
input_embeddings = token_embeddings + pos_embeddings
print(input_embeddings.shape) #torch.Size([8, 4, 256])